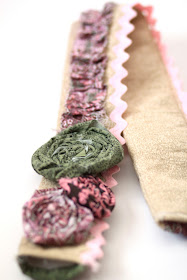
I didn't think of jazzing up my camera strap until I saw someone else with a unique strap. It was like a light bulb went off in my head. Why had I been using such a boring black camera strap when I could add a little personality to my camera. And since I now have a sewing machine I decided to make my own. I probably could have bought a new strap anywhere from $20-$100 instead I bought the materials to make three strap covers for $20. I'm not sure which strap I like the best but this tutorial explains how to do the most complicated one with the ruffles and bows. If you don't want all that jazz just don't put it on and follow the rest of the tutorial. It's as easy at that! And it should fit most straps. I covered the one that came with my camera and there is room to spare.
Materials needed:
2 pieces of fabric each 28"x 3.5"
1 piece of fabric 6"x 5"
1 piece heavy weight fusible fleece 26.5"x 5.5"
extra fabric for ruffles/bows (optional)
26" of ric rack (optional)
elastic
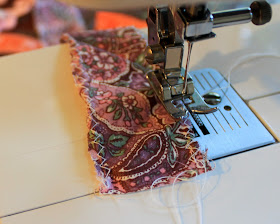
1) Make the ruffle. I suggest using a piece of material that is twice as long as you want it to end up and about 1 to 2 inches wide. Then use the large zig zag setting and do both sides of the material. Do not back stitch at the beginning or end! This is important!
2) Hold on to the bottom thread and gently bunch the material. Work your way through the whole pieces. This might take a few minutes. When done it should look like the picture below.
3) Now on to the pocket. Fold the shorter length over and then over again. On the second fold make sure there is room to put your elastic without sewing on of it.
4) Place your elastic and sew.
5) Fold up the bottom of the pocket two times and sew it.
6) Now pin the pocket to the bottom of the your main piece of fabric. You can do it at the very bottom or up a few inches. Which ever you prefer. I had to sew one side of the pocket because I only used one piece of fabric for the front and back instead of two. I don't recommend this. If you have a front piece and back piece than don't worry about this and just pin the pocket and leave the sides raw because they will get sewed later.
7) Pin the ruffle on and sew it down the middle. I made sure and did mine on the opposite side of the pocket since I want the pocket on the back.
If you did it right you will have a front piece and a separate back piece. Not just one piece like I have here. The way I did it is doable it just makes the pocket a pain to put on.
8) Now pin the ric rack on and sew.
9) Before the fleece you will need to sew your front and back pieces together. Just pin them right sides together and sew along one edge.
10) Next is the fleece. Iron it on.
11) Now fold up the end two times and sew. Repeat this on the other end.
12) Fold the cover so the fleece is facing out. Pin it and sew along the edge.
13) Turn the entire thing inside out.
14) Sew along the outside top and bottom edges. This step is actually optional. I perfer the look of it with it sewn but as you can see in the picture I only sewed the top and not the bottom.
15) Now make and hot glue any kind of flower or embellishments your like onto the front. Tutorial on how to make flowers here. Be creative with it.
This is the simplest one I made. The front and back are contrasting colors and the pocket is on the front with interfacing instead of elastic. I prefer the elastic pockets.
Here is the one I have on my camera now. It is Bob's favorite. The pocket is on the back in the same black and red material so it isn't noticeable. I also made the pocket a couple inches up from the bottom although I think I like the pocket positioned at the bottom best.


Great tutorial {saw you at Pinchusion Creative Link Party}. My sister in law and I have the same camera. We confuse them all the time. This certainly would be a great {and stylish} solution. Thanks!
ReplyDeleteI love all of this! Love the ricrac, the ruffle, and the rosette!! Thanks for sharing at oopsey daisy! The fabirc is super cute too!
ReplyDelete