Showing posts with label sew. Show all posts

Tuesday, May 19, 2015

18 Inch Doll Clothes Tutorial

A while back we bought Penelope an 18 inch Our Generation doll from Target.  For those not familiar they are pretty much the same as the American girl dolls but cheaper.  The only problem is that they clothes are about $10-$15 for an outfit!  That is too much for me to spend on a doll so I figured out how to make my own.  This tutorial explains how to turn a baby onesie into doll clothes.


Materials Needed:
Premie Onsie
Sewing Machine and supplies

1) The first step is to get your onsie.  I found that the premie size works best and they are in new condition at thrift stores all the time.  I got this one for 50 cents.  I love the onsies because they have a wide enough neck that you can put them on the dolls (and babies) with no buttons.

You can also do this with newborn size and other types of clothes, but for the tutorial lets stick with a premie size onsie.  Look how big it is compared to the doll.  Way too long.
2)  Measure where you want to cut it.  Make sure to leave room for folding and sewing.  I've found I like them to be cut just above where the leg seams are.


3)  Fold the end over two times and Iron it down.


4)  Sew along the fold.
That's it!  Now you have a new shirt for your daughter's doll.  This doll is named Lana by the way.
  
Below is another shirt I did.  It isn't a onsie and it is size newborn so it was a little bit different but I wanted to show that you really can do it to most baby clothes.  

All I did was put the shirt on the doll inside out.  Then I pinned it down the front and sides and sewed it smaller.  I also shorted the hem like I did for the onsie.  This shirt has buttons on the back and is still a little tight to put on the doll, so make sure you have enough room in the neck to get the arms in and out.  
I also made an adorable newborn sized swimsuit and a few other things this way.  I spent one nap time on it and about $5 and got a few different outfits for my girls to play around with.  A great investment!


Friday, April 18, 2014

1920 Singer Sewing Machine

Every year our town Rotary club has a rummage sale.  It is pretty much a big garage sale that a bunch of people donated to.  We try to go every year but ours is pretty small time compared to the Bainbridge island one.  So this year I slept in until 7:40 and it started at 8.  Opps.  It is only a couple blocks away so I put some clothes on ate a quick breakfast and made it just after 8.  I didn't find much in the main area but we walked through a dedicated furniture room and found this beauty.
I was so excited when I saw it and best thing it was only marked $10.  I'm pretty sure whomever marked it just thought it was a night stand.  But I suspected right away it was more because of the double top.  And I was right check it out.
It is a 1920 Singer Sewing Machine and the original table and owners manual.  Plus it totally works!  It even had thread all hooked up and a seem ripper in the drawer.  I think some was actually using it to sew with.  Probably someone's grandma died and they donated her stuff to the sale.  Two times I had to ask for help to move it (these things are heavy) and the worker was shocked at how much it weighed. They also had no idea there was a secret iron sewing machine inside.
I probably could have bargained them down to $8 but I figure $10 was already a steal.  On ebay they are selling for about $100-$300.  I am going to keep it though.  For now it will sit in our garage but once we have some more space I'm thinking about painting it and using it as a table in our house.


Wednesday, May 29, 2013

A Different Kind of Tie

Last week I shared with you how to make a skinny tie and this week I want to show a different way to sew your own tie.  This one is a bit more traditional but can easily be made skinny if you want.

Materials Needed:
1/4 yard fabric
Elastic
Sewing Machine
Pattern

1) Download the pattern and cut out two tie pieces and one 3" by 6" neck piece.  This pattern is a good size for a toddler.  I made it just an inch shorter for my newborn and added about 5 inces for my 5 year old.
2) Put the right sides together and pin it.
3) Sew just the ends and cut off the tips.
4) Flip it the right direction.
5) Fold it in half so the back side is showing and sew down the length of it.
6) Open it up and press it flat.
7) Turn it inside out.  Now your tie piece is done.
8) Take your neck piece and fold it in half so the inside is showing.  Then sew down the long open side.
9) Flip it the right way, ad the amount of elastic you need, fold the ends under and sew it shut.

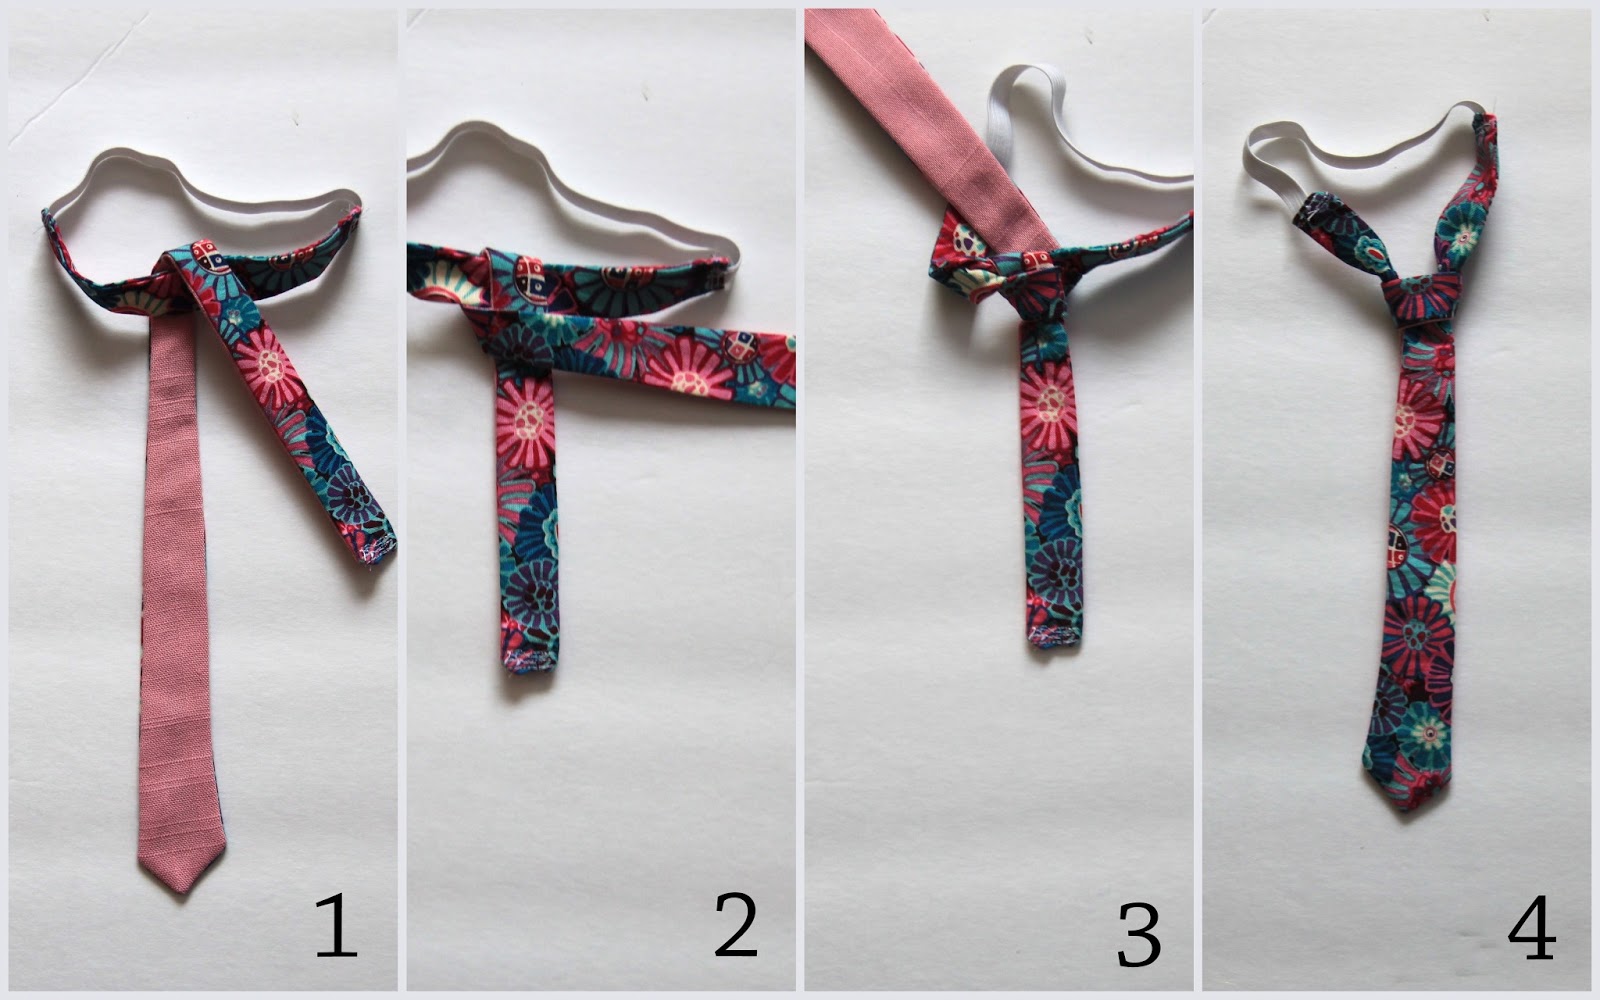
10) Go here for an easy way to tie the tie.


Tuesday, May 21, 2013

Newborn/Baby, Toddler/kid, and Adult Skinny Tie Tutorial

Now that I have two little boys I like to make matching Ties for them.  And I thought hey, since I am making ties why not make one for my husband as well? So I did.  This has got to be the easiest way to make a tie.  So if you want to know how to make a newborn or baby skinny tie, a kid sized skinny tie, or even an adult skinny tie check out this tutorial.

This project is very easy and it could be the perfect father's day present.  What dad doesn't want a tie for fathers day?  I think some of them expect it.  I like how much more variety you can get when you make your own ties.


Materials needed:
1/4 yard fabric (I used cotton)
sewing machine
elastic (child/newborn size only)

1) Cut your fabric.  You will need three pieces for the elastic ones (a front and back for the tie, and one for the neck piece) or just a front and back if making the adult size.

Sizes:
Neck Piece- 3" by 6"
newborn/toddler- 13" long, fat end 1 3/4" wide skinny end 1" wide
kid- 22" long fat end 2" wide skinny end 1 1/4" wide
adult- 66"long (or use half pieces hooked together) fat end 3" wide back end 1 1/2" wide

Once you know your measurements just draw straight lines from the front end of the tie to the back end. It should taper.  Then ad in a point in the front or just leave it square.  Your pieces should look like a regular tie shape.

2) Pin right sides together.
3) Sew three sides of the tie leaving the very small end open.  Then sew along the long part of the neck piece leaving both ends open.
4) Turn both pieces inside out, so they are now the right way.  Iron it flat.
5) Fold the ends in and sew it shut.  I just used the machine because no one should see this part anyway.
6) Figure out how long you need the elastic (I did about 8"), tuck it into the ends and sew them shut.


7) Tie the tie onto the neck piece.


Now I just need to make a few more.


Tuesday, November 20, 2012

Sock Monkey Tutorial

These sock monkeys are so adorable.  I've seen them around in stores but instead of buying another stuffed animal, we have a ton, I decided to make my own.  Even better, I cut apart two old stuffed animals and took their stuffing to use for my knew sock monkeys!  Just don't tell my kids, ok?

These monkeys are very easy to make, but can be a little time consuming because there is a lot of hand sewing.  You barely use a machine at all so it is a very easy beginner level project.  Even if you make a mistake here or there, I made a few, they still look cute.  And could they be another great Christmas present.

Materials Needed:
pair of women's knee length socks
felt
two black buttons
thread
stuffing
black embroidery thread
sewing machine

1) Turn your socks inside out and mark where you will sew them. My top sock is the body and the legs.  The other sock has the tail, both arms, both ears, and the nose.  The full length of the sock will make long arms, legs, and tail so you might want to shorten it like I did on my second monkey.

Sew along either side of the lines.  Leave one inch at the top of the legs unsewn and Make sure you have room to cut between the arms, legs, and tail.  The first time I didn't and had problems.  Your feet should be closed off on the end and the arms and tail should be closed on one end.

2) Turn it right side out through the crotch area and stuff it.
3) Hand sew it up.
4) Stuff the tail and hand sew it on.  Do the same for the arms.  I placed the arms around the middle of the body.
5) Cut out felt eyes, and sew the buttons on.  Hand sew the eyes in place.  Place them on the top third of the monkey's body.  On this first one I put them a little lower than I like.
6)  Sew the nose on, then stuff it  when  you have one inch left to sew.  Then finish sewing it.  I had to do this twice because the first time I started to put in on the wrong direction.
7) Sew on the ears just like the nose.


8) Embroider the mouth and you are done!
If you like the sock monkey's don't forget to pin them!  And if you use the tutorial for your blog please link back :)

Don't forget to check back to yesterday's post and sign up for the Hot Glue Gun Giveaway!

Tuesday, October 9, 2012

How to shorten pants with original hem


So I bought these pants knowing they were too long.  These might be my first purchase with the intent to fix them by sewing.  I feel like that somehow moves me up from beginner to I kinda know how to sew.  Anyway, it was soooo easy to shorten these pants.  It took me about 15 minutes  but you could probably do it in 5.  There was no cutting so if you might be growing you can take it out and the best part is that it uses the original hem.  These pants are a stretchy work out type material but it works just as well with jeans.  All you need is a sewing machine!

Materials needed:
Sewing Machine
Thread
Pants that are too long
Pins

 1) Fold the pants up (on the outside) to the desired length.  Keep in mind that you will be folding the hem back down.
 2) Sew a basic stitch right underneath the original hem.

3) Fold the hem back down and iron it flat.  If you want you can cut off the excess, but that isn't necessary unless it sticks out.  I left mine.
One thing I hate is hate is stepping on my pants when jogging, especially when it is wet outside.  Now I don't need to worry about that.  See, my adjusted pants rest just a half inch above the ground with my shoes on.  Perfect!